Starting point:
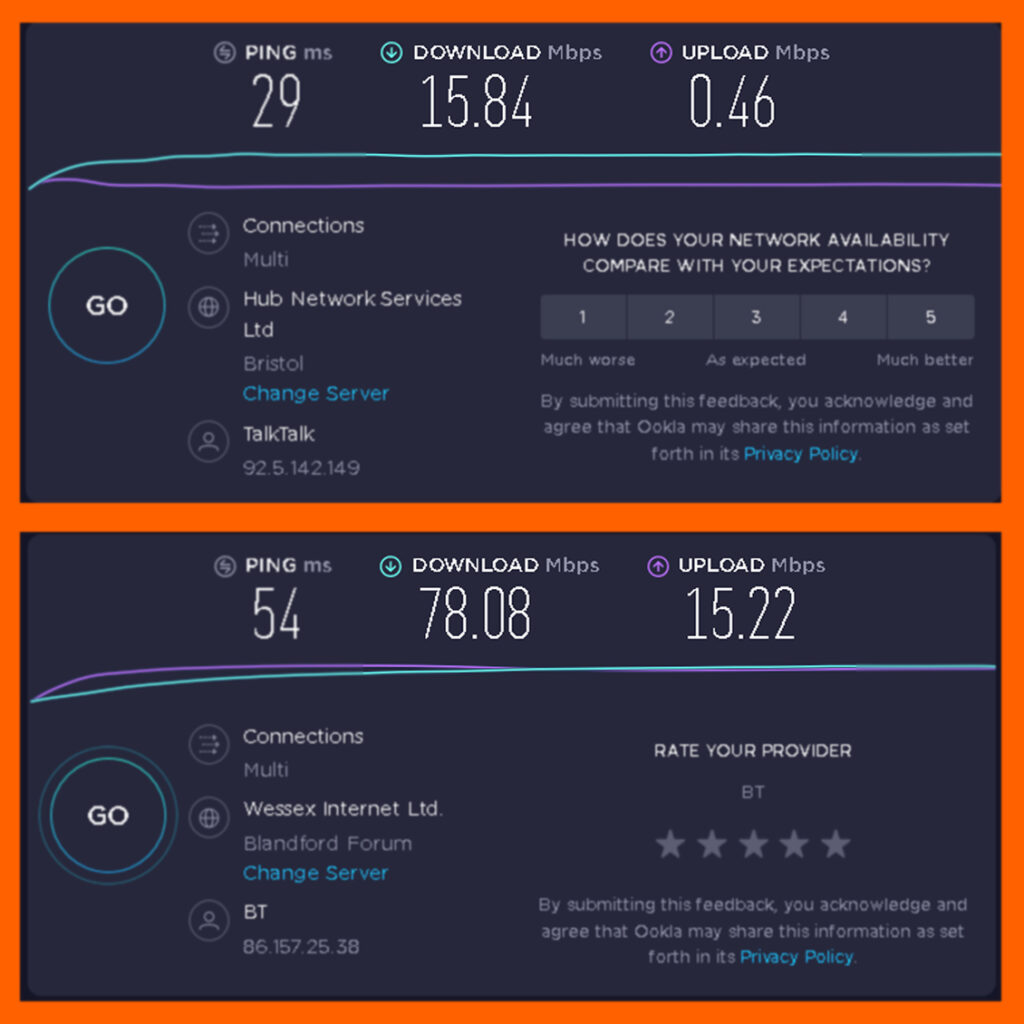
- Broadband speed was around the 15Mbps download and 0.5Mbps upload.
- Setup was: 1xADSL Broadband
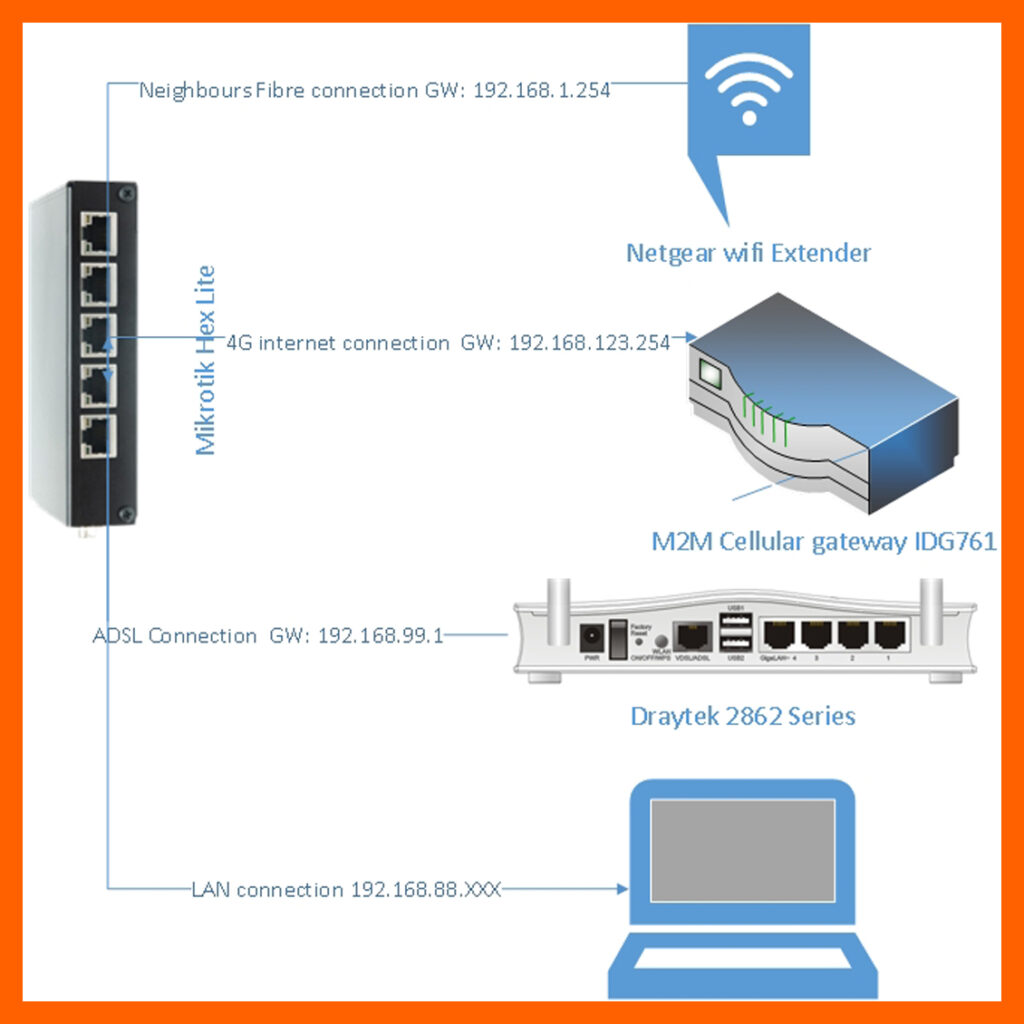
We implemented the following solution:
- 1xMikrotik Hex Lite router
- 1xADSL internet connection
- 1x4G internet connection
- 1xFibre connection (kindly loaned by my neighbour for the purpose of this test)
The configuration is as follows:
ADSL: the router is setup as a gateway on 192.168.99.1 using a TalkTalk ADSL 2 connection. Ethernet out goes to the Mikrotik router port ether1 renamed WAN1.
Fibre: The fibre connection is bridged over wifi from my neighbour’s house using a Netgear Extender N300. He has a BT fibre connection. Ethernet out goes to the Mikrotik router port ether2 renamed WAN2.
4G: the router is setup as a gateway on 192.168.123.254, it is using the Virgin mobile sim from my phone for testing purposes. Ethernet out goes to the Mikrotik router port ether3 renamed WAN3.
Mikrotik router:
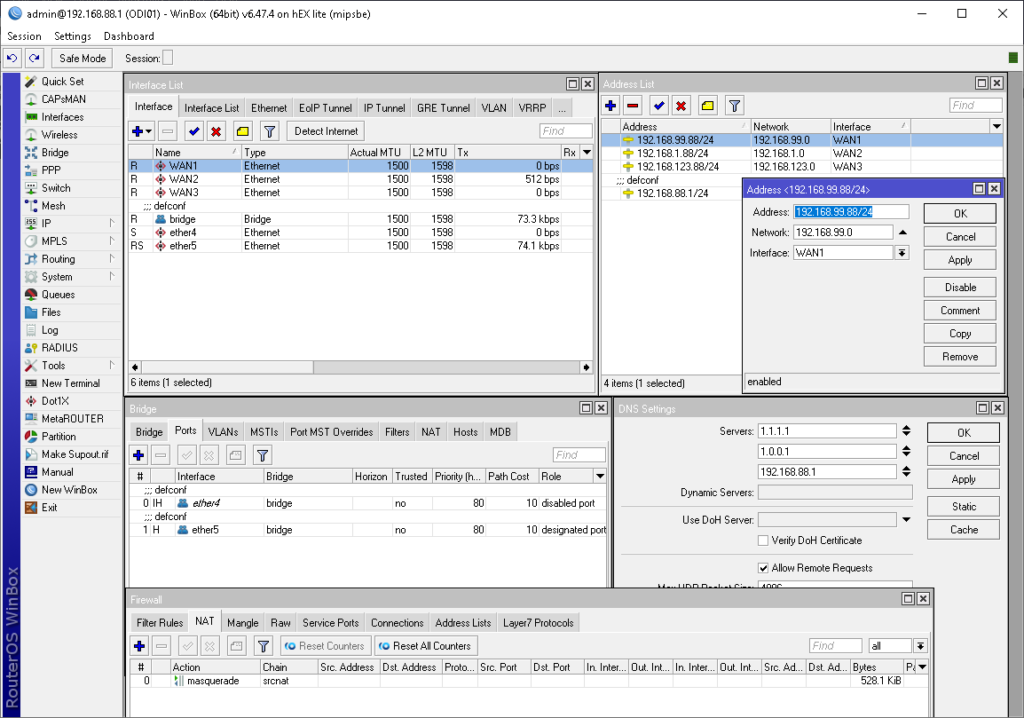
The Mikrotik router is a basic (very cheap around £40 new) 5 port Hex Lite router but thanks to Mikrotik’s advanced RouterOS, this thing is like the Matrix, you never know where the possibilities end. Anyways, back to the config.
The screenshot below shows the entirety of the config I needed to get this setup working, I added some firewall rules after but this is basically it.

Once you’ve setup the above configuration, add a route (IP\Routes) as pictured below. Add the IP address of your gateways according to your setup. That’s it, you should now have the speed of all your WAN connections comming through to your LAN bridge.

Results:
We went from 15.84Mbps download speed and 0.46Mbps upload speed to 78.08Mbps download speed and 15.84Mbps upload speed.

Here is the script to run in the Mikrotik terminal or SSH terminal to replicate the above configuration, enjoy!
/interface ethernet
set [ find default-name=ether1 ] name=WAN1
set [ find default-name=ether2 ] name=WAN2
set [ find default-name=ether3 ] disabled=yes name=WAN3
/interface list
add comment=defconf name=WAN
add comment=defconf name=LAN
/interface wireless security-profiles
set [ find default=yes ] supplicant-identity=MikroTik
/ip hotspot profile
set [ find default=yes ] html-directory=flash/hotspot
/ip pool
add name=dhcp ranges=192.168.88.10-192.168.88.200
/ip dhcp-server
add address-pool=dhcp disabled=no interface=bridge name=defconf
/interface bridge port
add bridge=bridge comment=defconf interface=ether4
add bridge=bridge comment=defconf interface=ether5
/ip neighbor discovery-settings
set discover-interface-list=LAN
/interface list member
add comment=defconf interface=bridge list=LAN
add comment=defconf interface=WAN1 list=WAN
/ip address
add address=192.168.88.1/24 comment=defconf interface=bridge network=\
192.168.88.0
add address=192.168.1.88/24 interface=WAN2 network=192.168.1.0
add address=192.168.99.88/24 interface=WAN1 network=192.168.99.0
add address=192.168.123.88/24 interface=WAN3 network=192.168.123.0
/ip dhcp-server network
add address=192.168.88.0/24 comment=defconf gateway=192.168.88.1 netmask=24
/ip dns
set allow-remote-requests=yes servers=1.1.1.1,1.0.0.1,192.168.88.1
/ip dns static
add address=192.168.88.1 comment=defconf name=router.lan
/ip firewall filter
add action=accept chain=input comment=\
“defconf: accept established,related,untracked” connection-state=\
established,related,untracked
add action=drop chain=input comment=”defconf: drop invalid” connection-state=\
invalid
add action=accept chain=input comment=”defconf: accept ICMP” protocol=icmp
add action=accept chain=input comment=\
“defconf: accept to local loopback (for CAPsMAN)” dst-address=127.0.0.1
add action=drop chain=input comment=”defconf: drop all not coming from LAN” \
in-interface-list=!LAN
add action=accept chain=forward comment=”defconf: accept in ipsec policy” \
ipsec-policy=in,ipsec
add action=accept chain=forward comment=”defconf: accept out ipsec policy” \
ipsec-policy=out,ipsec
add action=fasttrack-connection chain=forward comment=”defconf: fasttrack” \
connection-state=established,related
add action=accept chain=forward comment=\
“defconf: accept established,related, untracked” connection-state=\
established,related,untracked
add action=drop chain=forward comment=”defconf: drop invalid” \
connection-state=invalid
add action=drop chain=forward comment=\
“defconf: drop all from WAN not DSTNATed” connection-nat-state=!dstnat \
connection-state=new in-interface-list=WAN
/ip firewall mangle
add action=mark-connection chain=output connection-mark=no-mark \
connection-state=new new-connection-mark=ISP1_conn out-interface=WAN1
add action=mark-routing chain=output connection-mark=ISP1_conn \
new-routing-mark=to_ISP1 out-interface=WAN1
add action=mark-connection chain=output connection-mark=no-mark \
connection-state=new new-connection-mark=ISP2_conn out-interface=WAN2
add action=mark-routing chain=output connection-mark=ISP2_conn \
new-routing-mark=to_ISP2 out-interface=WAN2
/ip firewall nat
add action=masquerade chain=srcnat
/ip route
add check-gateway=ping disabled=yes distance=1 gateway=8.8.8.8 routing-mark=\
to_ISP1
add check-gateway=ping distance=1 gateway=\
192.168.123.254,192.168.99.1,192.168.1.254
/system clock
set time-zone-name=Europe/London
/system identity
set name=ODI01
/system note
set note=”Double WAN Load balanced:\r\
\nWAN1 connection Wan1-ether1-static-ip.\r\
\nWAN2 connection Wan2-ether2-static-ip.\r\
\nEth3-4-5-bridged\r\
\n”
/tool mac-server
set allowed-interface-list=LAN
/tool mac-server mac-winbox
set allowed-interface-list=LAN
OrangeDux Support Team.
